방화벽
이 장에서는 REST를 사용해 설정을 하는 방화벽을 사용하는 방법에 대해 설명합니다.
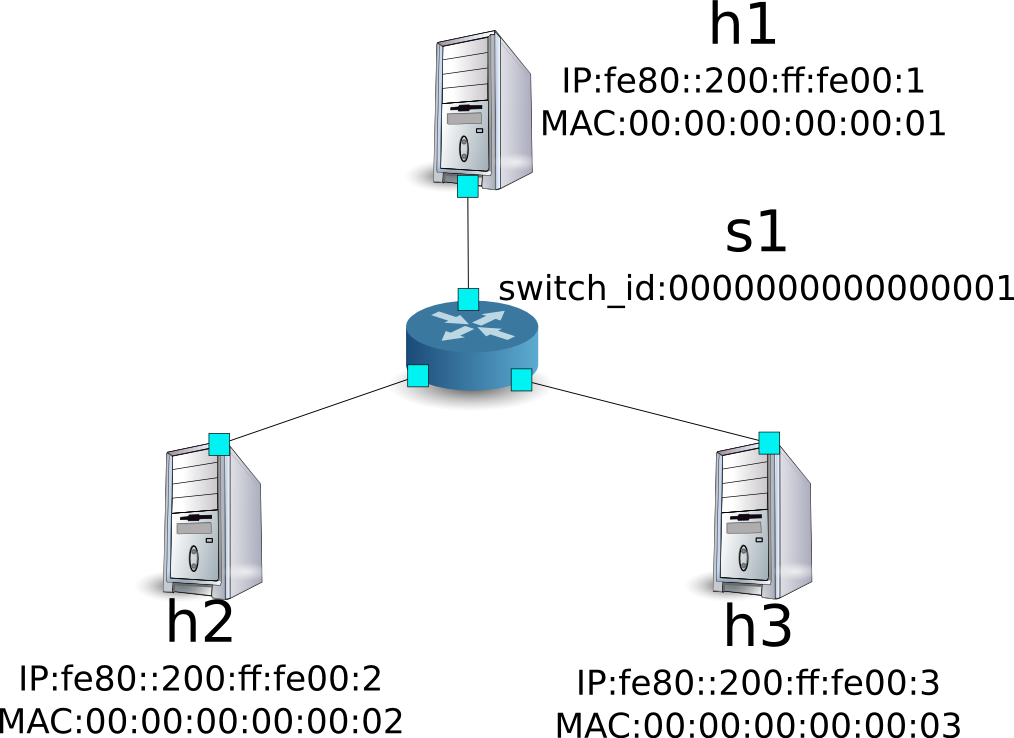
단일 테넌트의 동작 예 (IPv4)
다음과 같은 토폴로지를 만들고 해당 스위치 s1에 경로를 추가 · 삭제하는 예를 소개합니다.
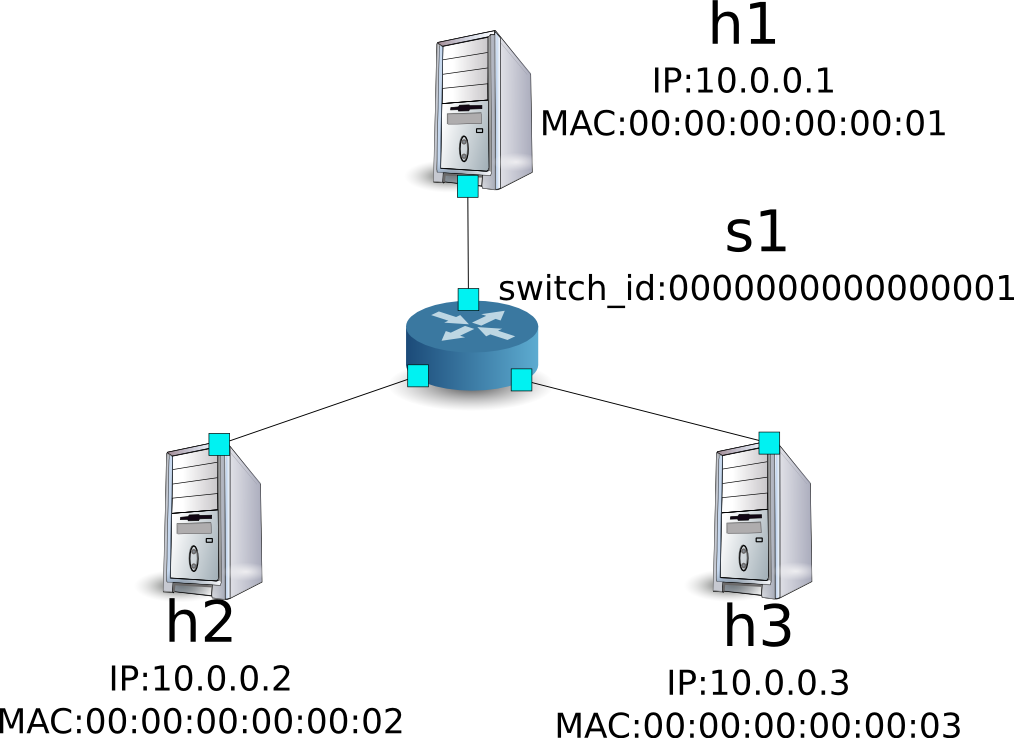
환경 구축
우선 Mininet에 환경을 구축합니다. 입력하는 명령어는 「 스위칭 허브 」에서와 같습니다.
ryu@ryu-vm:~$ sudo mn --topo single,3 --mac --switch ovsk --controller remote -x
*** Creating network
*** Adding controller
Unable to contact the remote controller at 127.0.0.1:6633
*** Adding hosts:
h1 h2 h3
*** Adding switches:
s1
*** Adding links:
(h1, s1) (h2, s1) (h3, s1)
*** Configuring hosts
h1 h2 h3
*** Running terms on localhost:10.0
*** Starting controller
*** Starting 1 switches
s1

*** Starting CLI:
mininet>
또한 컨트롤러에 대한 xterm을 하나 더 시작합니다.
mininet> xterm c0
mininet>
이어 사용하는 OpenFlow 버전을 1.3으로 설정합니다.
switch: s1 (root):
root@ryu-vm:~# ovs-vsctl set Bridge s1 protocols=OpenFlow13
마지막으로, 컨트롤러 xterm에서 rest_firewall을 시작합니다.
controller: c0 (root):
root@ryu-vm:~# ryu-manager ryu.app.rest_firewall
loading app ryu.app.rest_firewall
loading app ryu.controller.ofp_handler
instantiating app None of DPSet
creating context dpset
creating context wsgi
instantiating app ryu.app.rest_firewall of RestFirewallAPI
instantiating app ryu.controller.ofp_handler of OFPHandler
(2210) wsgi starting up on http://0.0.0.0:8080/
Ryu와 스위치 간의 연결에 성공하면 다음 메시지가 표시됩니다.
controller: c0 (root):
[FW][INFO] switch_id=0000000000000001: Join as firewall
초기 상태의 변경
firewall 시작 직후에는 모든 통신을 차단하도록 비활성화 상태로 되어 있습니다. 다음 명령으로 활성화 (enable)합니다.
주석
이후의 설명에서 사용하는 REST API의 자세한 내용은 장 뒷부분의 「 REST API 목록 」 을 참조 하십시오.
Node: c0 (root):
root@ryu-vm:~# curl -X PUT http://localhost:8080/firewall/module/enable/0000000000000001
  [
    {
      "switch_id": "0000000000000001",
      "command_result": {
        "result": "success",
        "details": "firewall running."
      }
    }
  ]

root@ryu-vm:~# curl http://localhost:8080/firewall/module/status
  [
    {
      "status": "enable",
      "switch_id": "0000000000000001"
    }
  ]
주석
REST 명령의 실행 결과는 보기 쉽도록 포맷화하였습니다.
h1에서 h2에 ping 통신을 확인해 보십시오. 그러나 권한 규칙을 설정하지 않기 때문에 차단되어 버립니다.
host: h1:
root@ryu-vm:~# ping 10.0.0.2
PING 10.0.0.2 (10.0.0.2) 56(84) bytes of data.
^C
--- 10.0.0.2 ping statistics ---
20 packets transmitted, 0 received, 100% packet loss, time 19003ms
차단된 패킷 로그에 기록됩니다.
controller: c0 (root):
[FW][INFO] dpid=0000000000000001: Blocked packet = ethernet(dst='00:00:00:00:00:02',ethertype=2048,src='00:00:00:00:00:01'), ipv4(csum=9895,dst='10.0.0.2',flags=2,header_length=5,identification=0,offset=0,option=None,proto=1,src='10.0.0.1',tos=0,total_length=84,ttl=64,version=4), icmp(code=0,csum=55644,data=echo(data='K\x8e\xaeR\x00\x00\x00\x00=\xc6\r\x00\x00\x00\x00\x00\x10\x11\x12\x13\x14\x15\x16\x17\x18\x19\x1a\x1b\x1c\x1d\x1e\x1f !"#$%&\'()*+,-./01234567',id=6952,seq=1),type=8)
...
규칙 추가
h1과 h2 사이에서 ping을 허용하는 규칙을 추가합니다. 양방향 규칙을 추가해야 합니다.
다음 규칙을 추가하여 봅시다. 규칙 ID는 자동 번호 지정됩니다.
| 원본 | 대상 | 프로토콜 | 여부 | (규칙ID) |
|---|---|---|---|---|
| 10.0.0.1/32 | 10.0.0.2/32 | ICMP | 허용 | 1 |
| 10.0.0.2/32 | 10.0.0.1/32 | ICMP | 허용 | 2 |
Node: c0 (root):
root@ryu-vm:~# curl -X POST -d '{"nw_src": "10.0.0.1/32", "nw_dst": "10.0.0.2/32", "nw_proto": "ICMP"}' http://localhost:8080/firewall/rules/0000000000000001
  [
    {
      "switch_id": "0000000000000001",
      "command_result": [
        {
          "result": "success",
          "details": "Rule added. : rule_id=1"
        }
      ]
    }
  ]

root@ryu-vm:~# curl -X POST -d '{"nw_src": "10.0.0.2/32", "nw_dst": "10.0.0.1/32", "nw_proto": "ICMP"}' http://localhost:8080/firewall/rules/0000000000000001
  [
    {
      "switch_id": "0000000000000001",
      "command_result": [
        {
          "result": "success",
          "details": "Rule added. : rule_id=2"
        }
      ]
    }
  ]
추가 규칙이 플로우 항목으로 스위치에 등록됩니다.
switch: s1 (root):
root@ryu-vm:~# ovs-ofctl -O openflow13 dump-flows s1
OFPST_FLOW reply (OF1.3) (xid=0x2):
 cookie=0x0, duration=823.705s, table=0, n_packets=10, n_bytes=420, priority=65534,arp actions=NORMAL
 cookie=0x0, duration=542.472s, table=0, n_packets=20, n_bytes=1960, priority=0 actions=CONTROLLER:128
 cookie=0x1, duration=145.05s, table=0, n_packets=0, n_bytes=0, priority=1,icmp,nw_src=10.0.0.1,nw_dst=10.0.0.2 actions=NORMAL
 cookie=0x2, duration=118.265s, table=0, n_packets=0, n_bytes=0, priority=1,icmp,nw_src=10.0.0.2,nw_dst=10.0.0.1 actions=NORMAL
또한 h2와 h3 사이에서 ping을 포함한 모든 IPv4 패킷을 허용하도록 규칙을 추가합니다.
| 원본 | 대상 | 프로토콜 | 여부 | (규칙ID) |
|---|---|---|---|---|
| 10.0.0.2/32 | 10.0.0.3/32 | any | 허용 | 3 |
| 10.0.0.3/32 | 10.0.0.2/32 | any | 허용 | 4 |
Node: c0 (root):
root@ryu-vm:~# curl -X POST -d '{"nw_src": "10.0.0.2/32", "nw_dst": "10.0.0.3/32"}' http://localhost:8080/firewall/rules/0000000000000001
  [
    {
      "switch_id": "0000000000000001",
      "command_result": [
        {
          "result": "success",
          "details": "Rule added. : rule_id=3"
        }
      ]
    }
  ]

root@ryu-vm:~# curl -X POST -d '{"nw_src": "10.0.0.3/32", "nw_dst": "10.0.0.2/32"}' http://localhost:8080/firewall/rules/0000000000000001
  [
    {
      "switch_id": "0000000000000001",
      "command_result": [
        {
          "result": "success",
          "details": "Rule added. : rule_id=4"
        }
      ]
    }
  ]
추가 규칙이 플로우 항목으로 스위치에 등록됩니다.
switch: s1 (root):
OFPST_FLOW reply (OF1.3) (xid=0x2):
 cookie=0x3, duration=12.724s, table=0, n_packets=0, n_bytes=0, priority=1,ip,nw_src=10.0.0.2,nw_dst=10.0.0.3 actions=NORMAL
 cookie=0x4, duration=3.668s, table=0, n_packets=0, n_bytes=0, priority=1,ip,nw_src=10.0.0.3,nw_dst=10.0.0.2 actions=NORMAL
 cookie=0x0, duration=1040.802s, table=0, n_packets=10, n_bytes=420, priority=65534,arp actions=NORMAL
 cookie=0x0, duration=759.569s, table=0, n_packets=20, n_bytes=1960, priority=0 actions=CONTROLLER:128
 cookie=0x1, duration=362.147s, table=0, n_packets=0, n_bytes=0, priority=1,icmp,nw_src=10.0.0.1,nw_dst=10.0.0.2 actions=NORMAL
 cookie=0x2, duration=335.362s, table=0, n_packets=0, n_bytes=0, priority=1,icmp,nw_src=10.0.0.2,nw_dst=10.0.0.1 actions=NORMAL
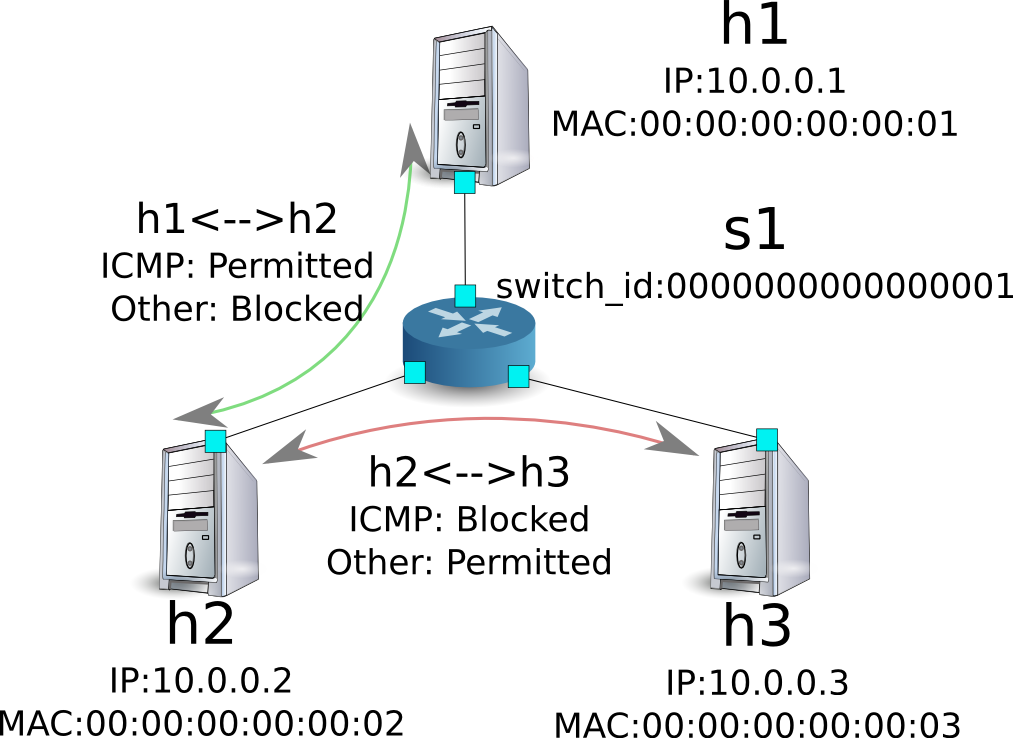
규칙에 우선 순위를 설정할 수 있습니다.
h2와 h3 사이에서 ping (ICMP)을 차단하는 규칙을 추가해 봅시다. 우선 순위로 디폴트 값 1보다 큰 값을 설정합니다.
| (우선순위) | 원본 | 대상 | 프로토콜 | 여부 | (규칙ID) |
|---|---|---|---|---|---|
| 10 | 10.0.0.2/32 | 10.0.0.3/32 | ICMP | 차단 | 5 |
| 10 | 10.0.0.3/32 | 10.0.0.2/32 | ICMP | 차단 | 6 |
Node: c0 (root):
root@ryu-vm:~# curl -X POST -d  '{"nw_src": "10.0.0.2/32", "nw_dst": "10.0.0.3/32", "nw_proto": "ICMP", "actions": "DENY", "priority": "10"}' http://localhost:8080/firewall/rules/0000000000000001
  [
    {
      "switch_id": "0000000000000001",
      "command_result": [
        {
          "result": "success",
          "details": "Rule added. : rule_id=5"
        }
      ]
    }
  ]

root@ryu-vm:~# curl -X POST -d  '{"nw_src": "10.0.0.3/32", "nw_dst": "10.0.0.2/32", "nw_proto": "ICMP", "actions": "DENY", "priority": "10"}' http://localhost:8080/firewall/rules/0000000000000001
  [
    {
      "switch_id": "0000000000000001",
      "command_result": [
        {
          "result": "success",
          "details": "Rule added. : rule_id=6"
        }
      ]
    }
  ]
추가 규칙이 플로우 항목으로 스위치에 등록됩니다.
switch: s1 (root):
root@ryu-vm:~# ovs-ofctl -O openflow13 dump-flows s1
OFPST_FLOW reply (OF1.3) (xid=0x2):
 cookie=0x3, duration=242.155s, table=0, n_packets=0, n_bytes=0, priority=1,ip,nw_src=10.0.0.2,nw_dst=10.0.0.3 actions=NORMAL
 cookie=0x4, duration=233.099s, table=0, n_packets=0, n_bytes=0, priority=1,ip,nw_src=10.0.0.3,nw_dst=10.0.0.2 actions=NORMAL
 cookie=0x0, duration=1270.233s, table=0, n_packets=10, n_bytes=420, priority=65534,arp actions=NORMAL
 cookie=0x0, duration=989s, table=0, n_packets=20, n_bytes=1960, priority=0 actions=CONTROLLER:128
 cookie=0x5, duration=26.984s, table=0, n_packets=0, n_bytes=0, priority=10,icmp,nw_src=10.0.0.2,nw_dst=10.0.0.3 actions=CONTROLLER:128
 cookie=0x1, duration=591.578s, table=0, n_packets=0, n_bytes=0, priority=1,icmp,nw_src=10.0.0.1,nw_dst=10.0.0.2 actions=NORMAL
 cookie=0x6, duration=14.523s, table=0, n_packets=0, n_bytes=0, priority=10,icmp,nw_src=10.0.0.3,nw_dst=10.0.0.2 actions=CONTROLLER:128
 cookie=0x2, duration=564.793s, table=0, n_packets=0, n_bytes=0, priority=1,icmp,nw_src=10.0.0.2,nw_dst=10.0.0.1 actions=NORMAL
규칙 확인
설정된 규칙을 확인합니다.
Node: c0 (root):
root@ryu-vm:~# curl http://localhost:8080/firewall/rules/0000000000000001
  [
    {
      "access_control_list": [
        {
          "rules": [
            {
              "priority": 1,
              "dl_type": "IPv4",
              "nw_dst": "10.0.0.3",
              "nw_src": "10.0.0.2",
              "rule_id": 3,
              "actions": "ALLOW"
            },
            {
              "priority": 1,
              "dl_type": "IPv4",
              "nw_dst": "10.0.0.2",
              "nw_src": "10.0.0.3",
              "rule_id": 4,
              "actions": "ALLOW"
            },
            {
              "priority": 10,
              "dl_type": "IPv4",
              "nw_proto": "ICMP",
              "nw_dst": "10.0.0.3",
              "nw_src": "10.0.0.2",
              "rule_id": 5,
              "actions": "DENY"
            },
            {
              "priority": 1,
              "dl_type": "IPv4",
              "nw_proto": "ICMP",
              "nw_dst": "10.0.0.2",
              "nw_src": "10.0.0.1",
              "rule_id": 1,
              "actions": "ALLOW"
            },
            {
              "priority": 10,
              "dl_type": "IPv4",
              "nw_proto": "ICMP",
              "nw_dst": "10.0.0.2",
              "nw_src": "10.0.0.3",
              "rule_id": 6,
              "actions": "DENY"
            },
            {
              "priority": 1,
              "dl_type": "IPv4",
              "nw_proto": "ICMP",
              "nw_dst": "10.0.0.1",
              "nw_src": "10.0.0.2",
              "rule_id": 2,
              "actions": "ALLOW"
            }
          ]
        }
      ],
      "switch_id": "0000000000000001"
    }
  ]
설정한 규칙을 그림으로 표시하면 다음과 같습니다.
h1에서 h2로 ping을 실행해 봅니다. 허용하는 규칙이 설정되어 있기 때문에 ping이 잘 됩니다.
host: h1:
root@ryu-vm:~# ping 10.0.0.2
PING 10.0.0.2 (10.0.0.2) 56(84) bytes of data.
64 bytes from 10.0.0.2: icmp_req=1 ttl=64 time=0.419 ms
64 bytes from 10.0.0.2: icmp_req=2 ttl=64 time=0.047 ms
64 bytes from 10.0.0.2: icmp_req=3 ttl=64 time=0.060 ms
64 bytes from 10.0.0.2: icmp_req=4 ttl=64 time=0.033 ms
...
h1에서 h2에 ping 아닌 패킷은 firewall에 의해 차단됩니다. 예를 들어 h1에서 h2에 wget을 실행하면 패킷이 차단되었다는 로그가 출력됩니다.
host: h1:
root@ryu-vm:~# wget http://10.0.0.2
--2013-12-16 15:00:38--  http://10.0.0.2/
Connecting to 10.0.0.2:80... ^C
controller: c0 (root):
[FW][INFO] dpid=0000000000000001: Blocked packet = ethernet(dst='00:00:00:00:00:02',ethertype=2048,src='00:00:00:00:00:01'), ipv4(csum=4812,dst='10.0.0.2',flags=2,header_length=5,identification=5102,offset=0,option=None,proto=6,src='10.0.0.1',tos=0,total_length=60,ttl=64,version=4), tcp(ack=0,bits=2,csum=45753,dst_port=80,offset=10,option='\x02\x04\x05\xb4\x04\x02\x08\n\x00H:\x99\x00\x00\x00\x00\x01\x03\x03\t',seq=1021913463,src_port=42664,urgent=0,window_size=14600)
...
h2와 h3 동안 ping 아닌 패킷 통신이 가능해지고 있습니다. 예를 들어 h2에서 h3에 ssh를 실행하면 패킷이 차단되었다는 로그는 출력되지 않습니다 (h3에서 sshd가 작 동하지 않기 때문에 ssh에서 연결에 실패합니다).
host: h2:
root@ryu-vm:~# ssh 10.0.0.3
ssh: connect to host 10.0.0.3 port 22: Connection refused
h2에서 h3를 ping하면 패킷이 firewall에 의해 차단되었다는 로그가 출력됩니다.
host: h2:
root@ryu-vm:~# ping 10.0.0.3
PING 10.0.0.3 (10.0.0.3) 56(84) bytes of data.
^C
--- 10.0.0.3 ping statistics ---
8 packets transmitted, 0 received, 100% packet loss, time 7055ms
controller: c0 (root):
[FW][INFO] dpid=0000000000000001: Blocked packet = ethernet(dst='00:00:00:00:00:03',ethertype=2048,src='00:00:00:00:00:02'), ipv4(csum=9893,dst='10.0.0.3',flags=2,header_length=5,identification=0,offset=0,option=None,proto=1,src='10.0.0.2',tos=0,total_length=84,ttl=64,version=4), icmp(code=0,csum=35642,data=echo(data='\r\x12\xcaR\x00\x00\x00\x00\xab\x8b\t\x00\x00\x00\x00\x00\x10\x11\x12\x13\x14\x15\x16\x17\x18\x19\x1a\x1b\x1c\x1d\x1e\x1f !"#$%&\'()*+,-./01234567',id=8705,seq=1),type=8)
...
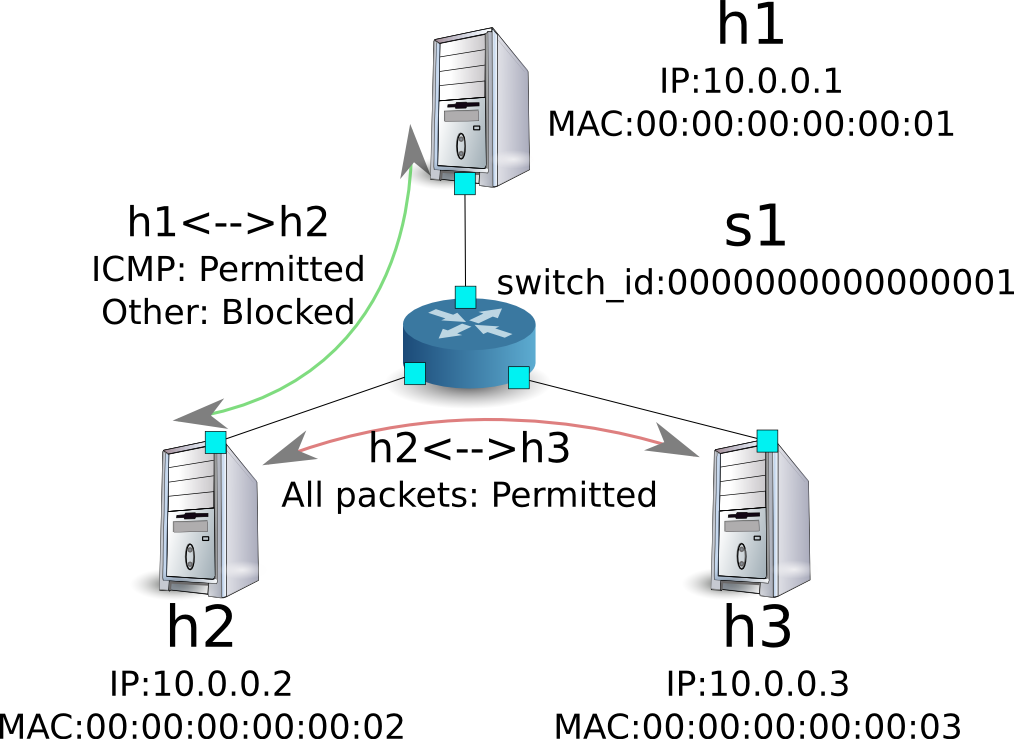
규칙 삭제
“rule_id:5”및 “rule_id:6”규칙을 삭제합니다.
Node: c0 (root):
root@ryu-vm:~# curl -X DELETE -d '{"rule_id": "5"}' http://localhost:8080/firewall/rules/0000000000000001
  [
    {
      "switch_id": "0000000000000001",
      "command_result": [
        {
          "result": "success",
          "details": "Rule deleted. : ruleID=5"
        }
      ]
    }
  ]

root@ryu-vm:~# curl -X DELETE -d '{"rule_id": "6"}' http://localhost:8080/firewall/rules/0000000000000001
  [
    {
      "switch_id": "0000000000000001",
      "command_result": [
        {
          "result": "success",
          "details": "Rule deleted. : ruleID=6"
        }
      ]
    }
  ]
현재 규칙을 그림으로 나타내면 다음과 같습니다.
실제로 확인해 봅시다. h2와 h3 사이의 ping (ICMP)을 차단하는 규칙이 삭제되었기 때문에, ping이 잘 오가는 것을 알 수 있습니다.
host: h2:
root@ryu-vm:~# ping 10.0.0.3
PING 10.0.0.3 (10.0.0.3) 56(84) bytes of data.
64 bytes from 10.0.0.3: icmp_req=1 ttl=64 time=0.841 ms
64 bytes from 10.0.0.3: icmp_req=2 ttl=64 time=0.036 ms
64 bytes from 10.0.0.3: icmp_req=3 ttl=64 time=0.026 ms
64 bytes from 10.0.0.3: icmp_req=4 ttl=64 time=0.033 ms
...
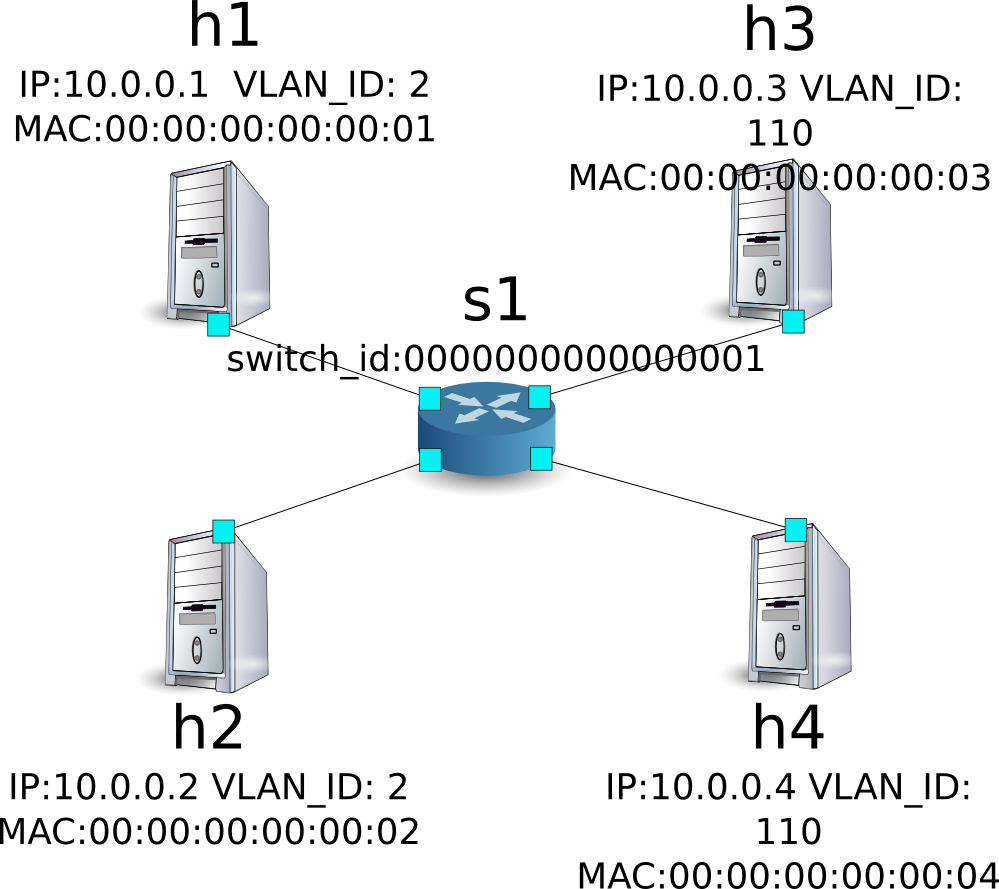
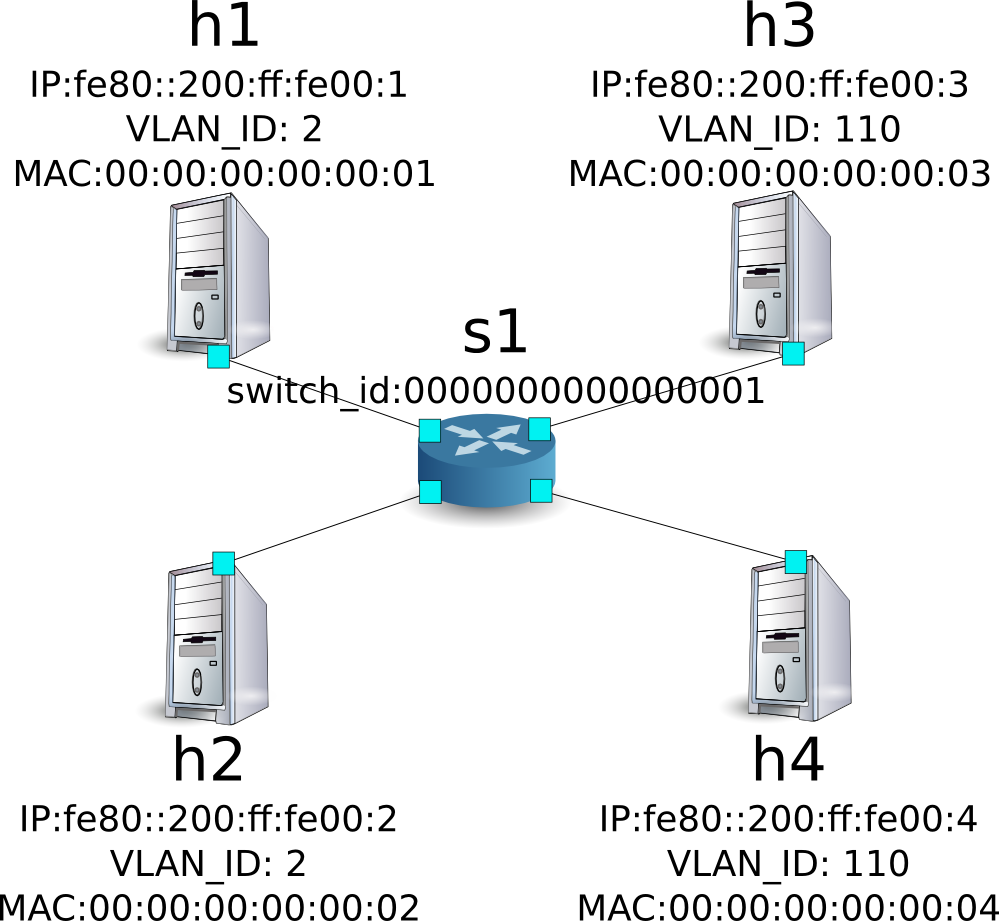
멀티 테넌트의 동작 예 (IPv4)
이어 VLAN에 의한 테넌트 분리가 이루어지고 있는 다음과 같은 토폴로지를 만들고 스위치 s1에 규칙을 추가하거나 삭제하여 각 호스트 사이의 통신 여부를 확인하는 방법을 소개합니다.
환경 구축
단일 테넌트의 예와 마찬가지로 Mininet에 환경을 구축하고 컨트롤러의 xterm 을 다시 시작해야합니다. 사용하는 호스트가 하나 증가하고 있는 것에 주의 하십시오.
ryu@ryu-vm:~$ sudo mn --topo single,4 --mac --switch ovsk --controller remote -x
*** Creating network
*** Adding controller
Unable to contact the remote controller at 127.0.0.1:6633
*** Adding hosts:
h1 h2 h3 h4
*** Adding switches:
s1
*** Adding links:
(h1, s1) (h2, s1) (h3, s1) (h4, s1)
*** Configuring hosts
h1 h2 h3 h4
*** Running terms on localhost:10.0
*** Starting controller
*** Starting 1 switches
s1

*** Starting CLI:
mininet> xterm c0
mininet>
이어 각 호스트 인터페이스에 VLAN ID를 설정합니다.
host: h1:
root@ryu-vm:~# ip addr del 10.0.0.1/8 dev h1-eth0
root@ryu-vm:~# ip link add link h1-eth0 name h1-eth0.2 type vlan id 2
root@ryu-vm:~# ip addr add 10.0.0.1/8 dev h1-eth0.2
root@ryu-vm:~# ip link set dev h1-eth0.2 up
host: h2:
root@ryu-vm:~# ip addr del 10.0.0.2/8 dev h2-eth0
root@ryu-vm:~# ip link add link h2-eth0 name h2-eth0.2 type vlan id 2
root@ryu-vm:~# ip addr add 10.0.0.2/8 dev h2-eth0.2
root@ryu-vm:~# ip link set dev h2-eth0.2 up
host: h3:
root@ryu-vm:~# ip addr del 10.0.0.3/8 dev h3-eth0
root@ryu-vm:~# ip link add link h3-eth0 name h3-eth0.110 type vlan id 110
root@ryu-vm:~# ip addr add 10.0.0.3/8 dev h3-eth0.110
root@ryu-vm:~# ip link set dev h3-eth0.110 up
host: h4:
root@ryu-vm:~# ip addr del 10.0.0.4/8 dev h4-eth0
root@ryu-vm:~# ip link add link h4-eth0 name h4-eth0.110 type vlan id 110
root@ryu-vm:~# ip addr add 10.0.0.4/8 dev h4-eth0.110
root@ryu-vm:~# ip link set dev h4-eth0.110 up
또한 사용하는 OpenFlow 버전을 1.3으로 설정합니다.
switch: s1 (root):
root@ryu-vm:~# ovs-vsctl set Bridge s1 protocols=OpenFlow13
마지막으로, 컨트롤러 xterm에서 rest_firewall을 시작합니다.
controller: c0 (root):
root@ryu-vm:~# ryu-manager ryu.app.rest_firewall
loading app ryu.app.rest_firewall
loading app ryu.controller.ofp_handler
instantiating app None of DPSet
creating context dpset
creating context wsgi
instantiating app ryu.app.rest_firewall of RestFirewallAPI
instantiating app ryu.controller.ofp_handler of OFPHandler
(13419) wsgi starting up on http://0.0.0.0:8080/
Ryu와 스위치 간의 연결에 성공하면 다음 메시지가 표시됩니다.
controller: c0 (root):
[FW][INFO] switch_id=0000000000000001: Join as firewall
초기 상태의 변경
firewall을 활성화 (enable)합니다.
Node: c0 (root):
root@ryu-vm:~# curl -X PUT http://localhost:8080/firewall/module/enable/0000000000000001
  [
    {
      "switch_id": "0000000000000001",
      "command_result": {
        "result": "success",
        "details": "firewall running."
      }
    }
  ]

root@ryu-vm:~# curl http://localhost:8080/firewall/module/status
  [
    {
      "status": "enable",
      "switch_id": "0000000000000001"
    }
  ]
규칙 추가
vlan_id=2에 10.0.0.0/8로 송수신되는 ping (ICMP 패킷)을 허용하는 규칙을 추가 합니다. 양방향 규칙을 설정할 필요가 있기 때문에 규칙을 모두 추가합니다.
| (우선순위) | VLAN ID | 원본 | 대상 | 프로토콜 | 여부 | (규칙 ID) |
|---|---|---|---|---|---|---|
| 1 | 2 | 10.0.0.0/8 | any | ICMP | 허용 | 1 |
| 1 | 2 | any | 10.0.0.0/8 | ICMP | 허용 | 2 |
Node: c0 (root):
root@ryu-vm:~# curl -X POST -d '{"nw_src": "10.0.0.0/8", "nw_proto": "ICMP"}' http://localhost:8080/firewall/rules/0000000000000001/2
  [
    {
      "switch_id": "0000000000000001",
      "command_result": [
        {
          "result": "success",
          "vlan_id": 2,
          "details": "Rule added. : rule_id=1"
        }
      ]
    }
  ]

root@ryu-vm:~# curl -X POST -d '{"nw_dst": "10.0.0.0/8", "nw_proto": "ICMP"}' http://localhost:8080/firewall/rules/0000000000000001/2
  [
    {
      "switch_id": "0000000000000001",
      "command_result": [
        {
          "result": "success",
          "vlan_id": 2,
          "details": "Rule added. : rule_id=2"
        }
      ]
    }
  ]
규칙 확인
설정된 규칙을 확인합니다.
Node: c0 (root):
root@ryu-vm:~# curl http://localhost:8080/firewall/rules/0000000000000001/all
  [
    {
      "access_control_list": [
        {
          "rules": [
            {
              "priority": 1,
              "dl_type": "IPv4",
              "nw_proto": "ICMP",
              "dl_vlan": 2,
              "nw_src": "10.0.0.0/8",
              "rule_id": 1,
              "actions": "ALLOW"
            },
            {
              "priority": 1,
              "dl_type": "IPv4",
              "nw_proto": "ICMP",
              "nw_dst": "10.0.0.0/8",
              "dl_vlan": 2,
              "rule_id": 2,
              "actions": "ALLOW"
            }
          ],
          "vlan_id": 2
        }
      ],
      "switch_id": "0000000000000001"
    }
  ]
실제로 확인해 보겠습니다. vlan_id=2이다 h1에서, 같은 vlan_id=2이다 h2 대해 ping을 실행하면 추가한 규칙에 의해 통신되는 것을 알 수 있습니다.
host: h1:
root@ryu-vm:~# ping 10.0.0.2
PING 10.0.0.2 (10.0.0.2) 56(84) bytes of data.
64 bytes from 10.0.0.2: icmp_req=1 ttl=64 time=0.893 ms
64 bytes from 10.0.0.2: icmp_req=2 ttl=64 time=0.098 ms
64 bytes from 10.0.0.2: icmp_req=3 ttl=64 time=0.122 ms
64 bytes from 10.0.0.2: icmp_req=4 ttl=64 time=0.047 ms
...
vlan_id = 110 사이다 h3와 h4 사이에는 규칙이 등록되어 있지 않기 때문에, ping 패킷 포트는 차단됩니다.
host: h3:
root@ryu-vm:~# ping 10.0.0.4
PING 10.0.0.4 (10.0.0.4) 56(84) bytes of data.
^C
--- 10.0.0.4 ping statistics ---
6 packets transmitted, 0 received, 100% packet loss, time 4999ms
패킷이 차단되었기 때문에 로그가 출력됩니다.
controller: c0 (root):
[FW][INFO] dpid=0000000000000001: Blocked packet = ethernet(dst='00:00:00:00:00:04',ethertype=33024,src='00:00:00:00:00:03'), vlan(cfi=0,ethertype=2048,pcp=0,vid=110), ipv4(csum=9891,dst='10.0.0.4',flags=2,header_length=5,identification=0,offset=0,option=None,proto=1,src='10.0.0.3',tos=0,total_length=84,ttl=64,version=4), icmp(code=0,csum=58104,data=echo(data='\xb8\xa9\xaeR\x00\x00\x00\x00\xce\xe3\x02\x00\x00\x00\x00\x00\x10\x11\x12\x13\x14\x15\x16\x17\x18\x19\x1a\x1b\x1c\x1d\x1e\x1f !"#$%&\'()*+,-./01234567',id=7760,seq=4),type=8)
...
단일 테넌트의 동작 예 (IPv6)
이어서, 「단일 테넌트의 동작 예 (IPv4) 」와 동일한 토폴로지에서 IPv6 주소를 해당 스위치 s1에 경로를 추가 · 삭제하고, 각 호스트 사이의 통신 여부를 확인하는 방법을 소개합니다.
환경 구축
우선 「단일 테넌트의 동작 예 (IPv4) 」와 마찬가지로 Mininet에 환경을 구축합니다.
ryu@ryu-vm:~$ sudo mn --topo single,3 --mac --switch ovsk --controller remote -x
*** Creating network
*** Adding controller
Unable to contact the remote controller at 127.0.0.1:6633
*** Adding hosts:
h1 h2 h3
*** Adding switches:
s1
*** Adding links:
(h1, s1) (h2, s1) (h3, s1)
*** Configuring hosts
h1 h2 h3
*** Running terms on localhost:10.0
*** Starting controller
*** Starting 1 switches
s1
*** Starting CLI:
mininet>
또한 컨트롤러에 대한 xterm을 하나 더 시작합니다.
mininet> xterm c0
mininet>
이어 사용하는 OpenFlow 버전을 1.3으로 설정합니다.
switch: s1 (root):
root@ryu-vm:~# ovs-vsctl set Bridge s1 protocols=OpenFlow13
마지막으로, 컨트롤러 xterm에서 rest_firewall을 시작합니다.
controller: c0 (root):
root@ryu-vm:~# ryu-manager ryu.app.rest_firewall
loading app ryu.app.rest_firewall
loading app ryu.controller.ofp_handler
instantiating app None of DPSet
creating context dpset
creating context wsgi
instantiating app ryu.app.rest_firewall of RestFirewallAPI
instantiating app ryu.controller.ofp_handler of OFPHandler
(2210) wsgi starting up on http://0.0.0.0:8080/
Ryu와 스위치 간의 연결에 성공하면 다음 메시지가 표시됩니다.
controller: c0 (root):
[FW][INFO] switch_id=0000000000000001: Join as firewall
초기 상태의 변경
다음 명령으로 활성화 (enable)합니다.
Node: c0 (root):
root@ryu-vm:~# curl -X PUT http://localhost:8080/firewall/module/enable/0000000000000001
  [
    {
      "switch_id": "0000000000000001",
      "command_result": {
        "result": "success",
        "details": "firewall running."
      }
    }
  ]

root@ryu-vm:~# curl http://localhost:8080/firewall/module/status
  [
    {
      "status": "enable",
      "switch_id": "0000000000000001"
    }
  ]
규칙 추가
h1과 h2 사이에서 ping을 허용하는 규칙을 추가합니다. 양방향 규칙을 추가해야 합니다.
다음 규칙을 추가하여 봅시다. 규칙 ID는 자동 번호 지정됩니다.
| 원본 | 대상 | 프로토콜 | 여부 | (규칙ID) | (비고) |
|---|---|---|---|---|---|
| fe80::200:ff:fe00:1 | fe80::200:ff:fe00:2 | ICMPv6 | 허용 | 1 | Unicast message (Echo) |
| fe80::200:ff:fe00:2 | fe80::200:ff:fe00:1 | ICMPv6 | 허용 | 2 | Unicast message (Echo) |
| fe80::200:ff:fe00:1 | ff02::1:ff00:2 | ICMPv6 | 허용 | 3 | Multicast message (Neighbor Discovery) |
| fe80::200:ff:fe00:2 | ff02::1:ff00:1 | ICMPv6 | 허용 | 4 | Multicast message (Neighbor Discovery) |
Node: c0 (root):
root@ryu-vm:~# curl -X POST -d '{"ipv6_src": "fe80::200:ff:fe00:1", "ipv6_dst": "fe80::200:ff:fe00:2", "nw_proto": "ICMPv6"}' http://localhost:8080/firewall/rules/0000000000000001
  [
    {
      "switch_id": "0000000000000001",
      "command_result": [
        {
          "result": "success",
          "details": "Rule added. : rule_id=1"
        }
      ]
    }
  ]

root@ryu-vm:~# curl -X POST -d '{"ipv6_src": "fe80::200:ff:fe00:2", "ipv6_dst": "fe80::200:ff:fe00:1", "nw_proto": "ICMPv6"}' http://localhost:8080/firewall/rules/0000000000000001
  [
    {
      "switch_id": "0000000000000001",
      "command_result": [
        {
          "result": "success",
          "details": "Rule added. : rule_id=2"
        }
      ]
    }
  ]

root@ryu-vm:~# curl -X POST -d '{"ipv6_src": "fe80::200:ff:fe00:1", "ipv6_dst": "ff02::1:ff00:2", "nw_proto": "ICMPv6"}' http://localhost:8080/firewall/rules/0000000000000001
  [
    {
      "switch_id": "0000000000000001",
      "command_result": [
        {
          "result": "success",
          "details": "Rule added. : rule_id=3"
        }
      ]
    }
  ]

root@ryu-vm:~# curl -X POST -d '{"ipv6_src": "fe80::200:ff:fe00:2", "ipv6_dst": "ff02::1:ff00:1", "nw_proto": "ICMPv6"}' http://localhost:8080/firewall/rules/0000000000000001
  [
    {
      "switch_id": "0000000000000001",
      "command_result": [
        {
          "result": "success",
          "details": "Rule added. : rule_id=4"
        }
      ]
    }
  ]
규칙 확인
설정된 규칙을 확인합니다.
Node: c0 (root):
root@ryu-vm:~# curl http://localhost:8080/firewall/rules/0000000000000001/all
  [
    {
      "switch_id": "0000000000000001",
      "access_control_list": [
        {
          "rules": [
            {
              "ipv6_dst": "fe80::200:ff:fe00:2",
              "actions": "ALLOW",
              "rule_id": 1,
              "ipv6_src": "fe80::200:ff:fe00:1",
              "nw_proto": "ICMPv6",
              "dl_type": "IPv6",
              "priority": 1
            },
            {
              "ipv6_dst": "fe80::200:ff:fe00:1",
              "actions": "ALLOW",
              "rule_id": 2,
              "ipv6_src": "fe80::200:ff:fe00:2",
              "nw_proto": "ICMPv6",
              "dl_type": "IPv6",
              "priority": 1
            },
            {
              "ipv6_dst": "ff02::1:ff00:2",
              "actions": "ALLOW",
              "rule_id": 3,
              "ipv6_src": "fe80::200:ff:fe00:1",
              "nw_proto": "ICMPv6",
              "dl_type": "IPv6",
              "priority": 1
            },
            {
              "ipv6_dst": "ff02::1:ff00:1",
              "actions": "ALLOW",
              "rule_id": 4,
              "ipv6_src": "fe80::200:ff:fe00:2",
              "nw_proto": "ICMPv6",
              "dl_type": "IPv6",
              "priority": 1
            }
          ]
        }
      ]
    }
  ]
h1과 h2에 ping을 실행해 봅니다. 허용하는 규칙이 설정되어 있기 때문에 ping이 잘 됩니다.
host: h1:
root@ryu-vm:~# ping6 -I h1-eth0 fe80::200:ff:fe00:2
PING fe80::200:ff:fe00:2(fe80::200:ff:fe00:2) from fe80::200:ff:fe00:1 h1-eth0: 56 data bytes
64 bytes from fe80::200:ff:fe00:2: icmp_seq=1 ttl=64 time=0.954 ms
64 bytes from fe80::200:ff:fe00:2: icmp_seq=2 ttl=64 time=0.047 ms
64 bytes from fe80::200:ff:fe00:2: icmp_seq=3 ttl=64 time=0.055 ms
64 bytes from fe80::200:ff:fe00:2: icmp_seq=4 ttl=64 time=0.027 ms
...
h1과 h3 사이에는 규칙이 등록되어 있지 않기 때문에, ping 패킷이 차단됩니다.
host: h1:
root@ryu-vm:~# ping6 -I h1-eth0 fe80::200:ff:fe00:3
PING fe80::200:ff:fe00:3(fe80::200:ff:fe00:3) from fe80::200:ff:fe00:1 h1-eth0: 56 data bytes
From fe80::200:ff:fe00:1 icmp_seq=1 Destination unreachable: Address unreachable
From fe80::200:ff:fe00:1 icmp_seq=2 Destination unreachable: Address unreachable
From fe80::200:ff:fe00:1 icmp_seq=3 Destination unreachable: Address unreachable
^C
--- fe80::200:ff:fe00:3 ping statistics ---
4 packets transmitted, 0 received, +3 errors, 100% packet loss, time 2999ms
패킷이 차단되었기 때문에 로그가 출력됩니다.
controller: c0 (root):
[FW][INFO] dpid=0000000000000001: Blocked packet = ethernet(dst='33:33:ff:00:00:03',ethertype=34525,src='00:00:00:00:00:01'), ipv6(dst='ff02::1:ff00:3',ext_hdrs=[],flow_label=0,hop_limit=255,nxt=58,payload_length=32,src='fe80::200:ff:fe00:1',traffic_class=0,version=6), icmpv6(code=0,csum=31381,data=nd_neighbor(dst='fe80::200:ff:fe00:3',option=nd_option_sla(data=None,hw_src='00:00:00:00:00:01',length=1),res=0),type_=135)
...
멀티 테넌트의 동작 예 (IPv6)
이어 VLAN에 의한 테넌트 분리가 이루어지고 있는 다음과 같은 토폴로지를 만들고 스위치 s1에 규칙을 추가하거나 삭제하여 각 호스트 사이의 통신 여부를 확인하는 방법을 소개합니다.
환경 구축
먼저 「 멀티 테넌트의 동작 예 (IPv4) 」와 마찬가지로 Mininet에 환경을 구축합니다.
ryu@ryu-vm:~$ sudo mn --topo single,4 --mac --switch ovsk --controller remote -x
*** Creating network
*** Adding controller
Unable to contact the remote controller at 127.0.0.1:6633
*** Adding hosts:
h1 h2 h3 h4
*** Adding switches:
s1
*** Adding links:
(h1, s1) (h2, s1) (h3, s1) (h4, s1)
*** Configuring hosts
h1 h2 h3 h4
*** Running terms on localhost:10.0
*** Starting controller
*** Starting 1 switches
s1

*** Starting CLI:
mininet> xterm c0
mininet>
이어 각 호스트 인터페이스에 VLAN ID를 설정합니다.
host: h1:
root@ryu-vm:~# ip addr del fe80::200:ff:fe00:1/64 dev h1-eth0
root@ryu-vm:~# ip link add link h1-eth0 name h1-eth0.2 type vlan id 2
root@ryu-vm:~# ip addr add fe80::200:ff:fe00:1/64 dev h1-eth0.2
root@ryu-vm:~# ip link set dev h1-eth0.2 up
host: h2:
root@ryu-vm:~# ip addr del fe80::200:ff:fe00:2/64 dev h2-eth0
root@ryu-vm:~# ip link add link h2-eth0 name h2-eth0.2 type vlan id 2
root@ryu-vm:~# ip addr add fe80::200:ff:fe00:2/64 dev h2-eth0.2
root@ryu-vm:~# ip link set dev h2-eth0.2 up
host: h3:
root@ryu-vm:~# ip addr del fe80::200:ff:fe00:3/64 dev h3-eth0
root@ryu-vm:~# ip link add link h3-eth0 name h3-eth0.110 type vlan id 110
root@ryu-vm:~# ip addr add fe80::200:ff:fe00:3/64 dev h3-eth0.110
root@ryu-vm:~# ip link set dev h3-eth0.110 up
host: h4:
root@ryu-vm:~# ip addr del fe80::200:ff:fe00:4/64 dev h4-eth0
root@ryu-vm:~# ip link add link h4-eth0 name h4-eth0.110 type vlan id 110
root@ryu-vm:~# ip addr add fe80::200:ff:fe00:4/64 dev h4-eth0.110
root@ryu-vm:~# ip link set dev h4-eth0.110 up
또한 사용하는 OpenFlow 버전을 1.3으로 설정합니다.
switch: s1 (root):
root@ryu-vm:~# ovs-vsctl set Bridge s1 protocols=OpenFlow13
마지막으로, 컨트롤러 xterm에서 rest_firewall을 시작합니다.
controller: c0 (root):
root@ryu-vm:~# ryu-manager ryu.app.rest_firewall
loading app ryu.app.rest_firewall
loading app ryu.controller.ofp_handler
instantiating app None of DPSet
creating context dpset
creating context wsgi
instantiating app ryu.app.rest_firewall of RestFirewallAPI
instantiating app ryu.controller.ofp_handler of OFPHandler
(13419) wsgi starting up on http://0.0.0.0:8080/
Ryu와 스위치 간의 연결에 성공하면 다음 메시지가 표시됩니다.
controller: c0 (root):
[FW][INFO] switch_id=0000000000000001: Join as firewall
초기 상태의 변경
firewall을 활성화 (enable)합니다.
Node: c0 (root):
root@ryu-vm:~# curl -X PUT http://localhost:8080/firewall/module/enable/0000000000000001
  [
    {
      "switch_id": "0000000000000001",
      "command_result": {
        "result": "success",
        "details": "firewall running."
      }
    }
  ]

root@ryu-vm:~# curl http://localhost:8080/firewall/module/status
  [
    {
      "status": "enable",
      "switch_id": "0000000000000001"
    }
  ]
규칙 추가
vlan_id=2에 fe80::/64에서 송수신되는 ping (ICMPv6 패킷)을 허용하는 규칙을 추가합니다. 양방향 규칙을 설정해야 하므로 규칙을 모두 추가합니다.
| (우선순위) | VLAN ID | 원본 | 대상 | 프로토콜 | 여부 | (규칙 ID) |
|---|---|---|---|---|---|---|
| 1 | 2 | fe80::200:ff:fe00:1 | any | ICMPv6 | 허용 | 1 |
| 1 | 2 | fe80::200:ff:fe00:2 | any | ICMPv6 | 허용 | 2 |
Node: c0 (root):
root@ryu-vm:~# curl -X POST -d '{"ipv6_src": "fe80::200:ff:fe00:1", "nw_proto": "ICMPv6"}' http://localhost:8080/firewall/rules/0000000000000001/2
  [
    {
      "command_result": [
        {
          "details": "Rule added. : rule_id=1",
          "vlan_id": 2,
          "result": "success"
        }
      ],
      "switch_id": "0000000000000001"
    }
  ]

root@ryu-vm:~# curl -X POST -d '{"ipv6_src": "fe80::200:ff:fe00:2", "nw_proto": "ICMPv6"}' http://localhost:8080/firewall/rules/0000000000000001/2
  [
    {
      "command_result": [
        {
          "details": "Rule added. : rule_id=2",
          "vlan_id": 2,
          "result": "success"
        }
      ],
      "switch_id": "0000000000000001"
    }
  ]
규칙 확인
설정된 규칙을 확인합니다.
Node: c0 (root):
root@ryu-vm:~# curl http://localhost:8080/firewall/rules/0000000000000001/all
  [
    {
      "switch_id": "0000000000000001",
      "access_control_list": [
        {
          "vlan_id": "2",
          "rules": [
            {
              "actions": "ALLOW",
              "rule_id": 1,
              "dl_vlan": "2",
              "ipv6_src": "fe80::200:ff:fe00:1",
              "nw_proto": "ICMPv6",
              "dl_type": "IPv6",
              "priority": 1
            },
            {
              "actions": "ALLOW",
              "rule_id": 2,
              "dl_vlan": "2",
              "ipv6_src": "fe80::200:ff:fe00:2",
              "nw_proto": "ICMPv6",
              "dl_type": "IPv6",
              "priority": 1
            }
          ]
        }
      ]
    }
  ]
실제로 확인해 보겠습니다. vlan_id=2이다 h1에서, 같은 vlan_id=2이다 h2 대해 ping을 실행하면 추가한 규칙에 의해 통신되는 것을 알 수 있습니다.
host: h1:
root@ryu-vm:~# ping6 -I h1-eth0.2 fe80::200:ff:fe00:2
PING fe80::200:ff:fe00:2(fe80::200:ff:fe00:2) from fe80::200:ff:fe00:1 h1-eth0.2: 56 data bytes
64 bytes from fe80::200:ff:fe00:2: icmp_seq=1 ttl=64 time=0.609 ms
64 bytes from fe80::200:ff:fe00:2: icmp_seq=2 ttl=64 time=0.046 ms
64 bytes from fe80::200:ff:fe00:2: icmp_seq=3 ttl=64 time=0.046 ms
64 bytes from fe80::200:ff:fe00:2: icmp_seq=4 ttl=64 time=0.057 ms
...
vlan_id = 110 사이다 h3와 h4 사이에는 규칙이 등록되어 있지 않기 때문에, ping 패킷 포트는 차단됩니다.
host: h3:
root@ryu-vm:~# ping6 -I h3-eth0.110 fe80::200:ff:fe00:4
PING fe80::200:ff:fe00:4(fe80::200:ff:fe00:4) from fe80::200:ff:fe00:3 h3-eth0.110: 56 data bytes
From fe80::200:ff:fe00:3 icmp_seq=1 Destination unreachable: Address unreachable
From fe80::200:ff:fe00:3 icmp_seq=2 Destination unreachable: Address unreachable
From fe80::200:ff:fe00:3 icmp_seq=3 Destination unreachable: Address unreachable
^C
--- fe80::200:ff:fe00:4 ping statistics ---
4 packets transmitted, 0 received, +3 errors, 100% packet loss, time 3014ms
패킷이 차단되었기 때문에 로그가 출력됩니다.
controller: c0 (root):
[FW][INFO] dpid=0000000000000001: Blocked packet = ethernet(dst='33:33:ff:00:00:04',ethertype=33024,src='00:00:00:00:00:03'), vlan(cfi=0,ethertype=34525,pcp=0,vid=110), ipv6(dst='ff02::1:ff00:4',ext_hdrs=[],flow_label=0,hop_limit=255,nxt=58,payload_length=32,src='fe80::200:ff:fe00:3',traffic_class=0,version=6), icmpv6(code=0,csum=31375,data=nd_neighbor(dst='fe80::200:ff:fe00:4',option=nd_option_sla(data=None,hw_src='00:00:00:00:00:03',length=1),res=0),type_=135)
...
이 장에서는 구체적인 예를 들면서 방화벽의 사용 방법을 설명했습니다.
REST API 목록
이 장에서 소개한 rest_firewall의 REST API를 나열합니다.
모든 스위치의 사용 가능 상태 얻기
| 메서드 | GET |
| URL | /firewall/module/status |
각 스위치의 사용 가능 상태 변경
| 메서드 | PUT |
| URL | /firewall/module/{op}/{switch} –op: [ “enable” | “disable” ] –switch: [ “all” | 스위치ID ] |
| 주의 | 각 스위치의 초기 상태는 “disable”로 되어 있습니다. |
모든 규칙 가져오기
| 메서드 | GET |
| URL | /firewall/rules/{switch}[/{vlan}] –switch: [ “all” | 스위치ID ] –vlan: [ “all” | VLAN ID ] |
| 주의 | VLAN ID의 지정은 선택 사항입니다. |
규칙 추가
| 메서드 | POST |
| URL | /firewall/rules/{switch}[/{vlan}] –switch: [ “all” | 스위치ID ] –vlan: [ “all” | VLAN ID ] |
| 데이터 | priority:[ 0 - 65535 ] in_port:[ 0 - 65535 ] dl_src:”<xx:xx:xx:xx:xx:xx>” dl_dst:”<xx:xx:xx:xx:xx:xx>” dl_type:[ “ARP” | “IPv4” | “IPv6” ] nw_src:”<xxx.xxx.xxx.xxx/xx>” nw_dst:”<xxx.xxx.xxx.xxx/xx”> ipv6_src:”<xxxx:xxxx:xxxx:xxxx:xxxx:xxxx:xxxx:xxxx/xx>” ipv6_dst:”<xxxx:xxxx:xxxx:xxxx:xxxx:xxxx:xxxx:xxxx/xx>” nw_proto”:[ “TCP” | “UDP” | “ICMP” | “ICMPv6” ] tp_src:[ 0 - 65535 ] tp_dst:[ 0 - 65535 ] actions: [ “ALLOW” | “DENY” ] |
| 주의 | 등록에 성공하면 규칙 ID가 생성되어 응답에 포함됩니다. VLAN ID의 지정은 선택 사항입니다. |
규칙 삭제
| 메서드 | DELETE |
| URL | /firewall/rules/{switch}[/{vlan}] –switch: [ “all” | 스위치ID ] –vlan: [ “all” | VLAN ID ] |
| 데이터 | rule_id:[ “all” | 1 - ... ] |
| 주의 | VLAN ID의 지정은 선택 사항입니다. |
모든 스위치 로깅 상태 가져 오기
| 메서드 | GET |
| URL | /firewall/log/status |
각 스위치의 로깅 상태 변경
| 메서드 | PUT |
| URL | /firewall/log/{op}/{switch} –op: [ “enable” | “disable” ] –switch: [ “all” | 스위치ID ] |
| 주의 | 각 스위치의 초기 상태는 “enable”로되어 있습니다. |